The OpenGL/DirectX normal map format in use can be set in the Normal editor, at the "Normal Scale and Format" tool. Immediately after opening a normal map, this format can also be chosen in the Check-in tool of the normal map editor.
This format applies everywhere normal maps are created, for example in the Tiling Synth when doing a Multi-Generate.
If you have multiple GPUs or have an NVIDIA/AMD GPU and also a motherboard integrated GPU, PixPlant might not be using your fastest GPU.
When you launch PixPlant, the GPU being used is listed in PixPlant's window title for a while. This is also permanently listed in the About window (Help > About menu).
If the listed GPU is not the intended one, you'll need to set it up. This is quite easy and done in Windows Settings. Please see the link below for a detailed walk-through of doing this in Windows 10:
For system stability, Windows will freeze an app that uses the GPU continuously for more than a few seconds. This is known as a TDR (Timeout Detection and Recovery) error and may crash PixPlant, or only disable its rendering while still allowing file saving. Since PixPlant can operate in very large textures, it's impossible to know whether this error will occur. If you're getting this error, it may be a good idea to increase the TDR timeout value.
To do this, you'll need to change values in the Windows Registry. This can have serious consequences, so proceed only if you know what you are doing or ask someone qualified to do it.
To change the TDR timeout:
1) Run regedit, the Windows Registry Editor.
2) Navigate to Computer\HKEY_LOCAL_MACHINE\System\CurrentControlSet\Control\GraphicsDrivers.
3) If the value TdrDelay exists, double-click to change it to a higher number, like 5 or 10.
4) But if the TdrDelay value does not exist, right-click in the area at the right and select New > DWORD (32-bit) Value. Enter (exact case is important) the name TdrDelay, then double-click the created value, choose decimal and enter the number.
5) Do exactly the same as above, but to set or create a value named TdrDdiDelay, with the same number. Exact case for the name is important.
6) Restart Windows for settings to take effect.
Please note that future Windows or driver updates may reset this value, so you may need to set it back, in the case TDR errors return. More information is available at Microsoft.
The most frequent cause for this behavior are outdated GPU drivers. Please make sure you're running updated drivers for your GPU. If this didn't solve the problem, please Contact Support and kindly let us know your Windows version and GPU model.
PixPlant versions before 5.0.47 would crash during launch if the Windows environment variable QT_ANGLE_PLATFORM is set to "d3d9", which may be used by older software for compatibility.
To check if the global variable is set, type "env" in the Windows Start button and select "Edit system environment variables", then click the "Environment variables" button at the bottom. Check if QT_ANGLE_PLATFORM is listed there.
To solve this you can erase the global variable QT_ANGLE_PLATFORM, but this might create problems with older software that depends on it.
Or you can create a PixPlant5-run.cmd file in the PixPlant installation folder with these contents:
@set QT_ANGLE_PLATFORM=
@start PixPlant5.exe
This unsets the troublesome variable before running PixPlant. Make sure to run PixPlant5-run.cmd instead of the normal shortcuts.
Since version 5.0.47 this problem no longer occurs.
The PixPlant Photoshop plug-in will only return changes made on the image that you invoked it upon. Even if the input image size is changed in PixPlant, still the original size is returned to Photoshop.
This is a limitation of the Photoshop plug-in interface, as it can only receive back into the same (single) image where the plug-in was invoked.
However, you can still save the image (and all other extracted images) to a file or copy to the Clipboard before returning to Photoshop.
If you move 3D Preview's Displacement slider to the right, the preview displays with vertex displacement. When 3D-previewing higher resolution displacement maps, you may see the displaced surface appearing kind of pixelated.
To fix this, open the Preferences window, select Rendering tab. The Tessellation Subdivisions area controls how many times are the model surfaces subdivided, for the 3D editor views (Displacement and Normal maps) and for the 3D Preview. Increase this setting for fine-grained vertex displacement.
When you are using a painting tool, the default "3D Preview Performance" setting (in the Preferences window > Rendering tab) controls the preview update interval. Try setting this option to a lower (faster) value.
The F0 (Fresnel reflectance at 0 degrees) value is automatically handled by the 3D Preview shader. In a similar way to other common Metallic-Roughness renderers, this value is set to 4% for dielectrics, and interpolated to 100% as the metalness value increases to 1.0.
The Tiling Synth tools creates seamless tiling versions of an source image called a "seed image". A good seed image should have a reasonable number of repeated elements, either structured (for example bricks along a wall) or unstructured (for example pebbles in the ground). In both cases the more elements in the image the better as it allows PixPlant to extract and generate more visual variety.
A good seed image should also avoid strong luminosity contrasts; however you can correct these contrasts up to a point with the Equalize Seed setting.
It should also have its repeated elements as aligned as possible with the image sides, but this can usually be corrected with the Seed Wizard.
You should usually prefer seed images with lots of repeated elements (see What makes a good seed image? above), so that PixPlant has enough variety to generate the image. The following actions can improve the seamless tiling quality of the generated image:
PixPlant includes a setting that automatically snaps the Seed Scale settings to the nearest best value for tiling. This is important so that the pattern elements in the generated texture spatially "meet" at the image boundaries, so as to obtain a good tiling.
If the Scale Lock button at the right of the Seed Scale sliders is set, both width and height will snap - if you prefer, unset Scale Lock and then change the sliders individually.
In the Seed Viewer area, at the right side of the window, select with the mouse an area that you don't want PixPlant to use - this area will turn dark and won't be used. To make that black area available again, just click with the mouse over it.
Yes - simply select "None" in the Tiling Mode of the Global Settings and generate again. The Global Settings are available at the top-right corner of the PixPlant window.
In the Editor area, select, by pressing the left mouse button, an area that you want to generate to and press Generate. This will rely on the neighbor portions of the image to generate the part that you selected. Generating to a part of the image is very useful for expanding existing images with extra pixels at the sides for example.
If you always get the same pixels, this means that PixPlant is "land-locked" by the neighbor portions of the image - you can overcome this by increasing the size of generation area till it gives different results. This is usually only a problem when generating to small areas.
The following causes may be preventing activation to work:
Simply deactivate from the old computer and activate on the new one. To deactivate, select Help menu > Deactivate. To activate on the new computer, either select Activate from the launch window or select Help menu > Activate.
If you can no longer access a computer where PixPlant was activated or if your hardware has changed, and you can no longer deactivate PixPlant, please Contact Support so that we can deactivate it on our side.
Select Help menu > About. The "Activated License Information" section lists how many activations are included.
The Freelancer license can be used for commercial (and non-commercial) work, as long as the licensee is an individual or one-person business running the license on an owned computer.
Please be assured that PixPlant installer is safe and digitally signed with FaronStudio's Sectigo (formerly Comodo) code signing certificate: you can verify this by right-clicking the installer, then selecting Properties and then the "Digital Signatures" tab.
In the rare event that you may receive this Windows SmartScreen message, when running the PixPlant installer:
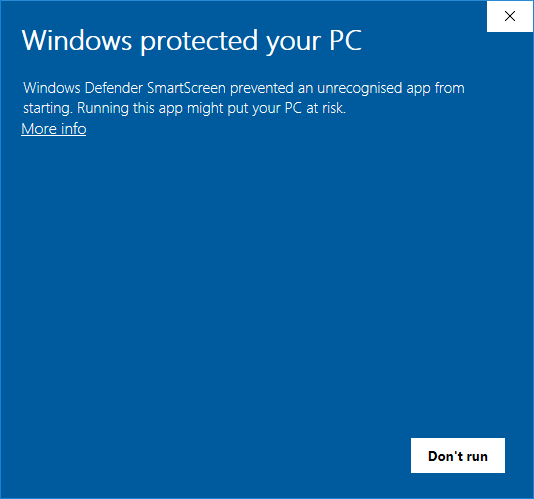
To continue, simply click More info at the top of the above window and the following appears:
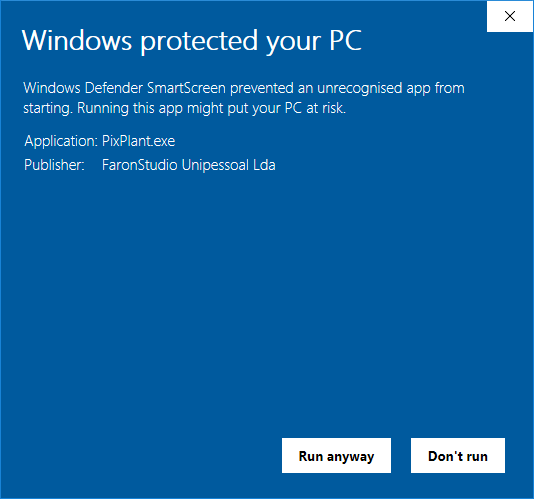
Click the "Run anyway" button at the bottom and PixPlant will install and run as normally.
This message may appear for a few days after a new PixPlant update has been available for download: after a certain number of installs across the world, this window stops appearing. It works this way because Microsoft automatically gathers reputation information via Windows telemetry and after some installs the PixPlant installer is considered recognized and cleared.
PixPlant includes a plug-in for 64-bit Adobe Photoshop or other compatible 64-bit hosts. The Windows installer already searches for Photoshop installations and copies the plug-in to the right location.
However, if you can't find the PixPlant 5 plug-in available in Photoshop, please install manually: simply go to the PixPlant installation folder and copy the file PixPlant5.8bf into the Plug-ins folder of your Photoshop installation.