PixPlant 5 Help
1. About PixPlant
PixPlant creates and edits 3D maps and quickly transforms common photos into seamlessly tiling materials.
The 5th major version of PixPlant includes many improvements. In fact so many things are new, that the version number has jumped from 3 to 5:
- Support for the Physically Based Rendering (PBR) Workflow, while maintaining support for the previous Traditional (Diffuse-Specular) 3D Workflow.
- Improved 3D Preview rendering with HDRI environment lighting. PBR Metallic-Roughness uses common GGX rendering, while Traditional Diffuse+Specular Workflow uses Blinn-Phong rendering.
- New Map Tools system with an intuitive interface and powerful capabilities. Fast GPU acceleration available in most tools.
- Includes the previous version's automatic tiling features with easy-to-use synchronized tiling of multiple maps.
- All map editing is done at 16-bit precision, with some tools working at floating point. Full sRGB support for the Base Color, Difuse and Specular maps, and linear space support for other maps.
- Includes an help system built inside the app with many contextual information buttons and interactive guides.
2. Interface Areas
The PixPlant interface is divided in three main areas:

The 3D Preview displays a rendering of a 3D model textured with maps being edited. It can be undocked from the main PixPlant into a separate window.
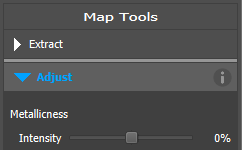
At the right side, the Map Tools area includes the tools available for the current editor. Click on the Tool header to use it.Some tools, mostly related to map extraction, are specific to individual map types, while others are common to many types.
The Map Editor area in the center is where you can view and edit the currently active 3D map. To switch between active maps, click the tabs above the Editor Area:

All editors can edit the map in a 2D view, which usually provides the best possible visualization for editing. But as surface relief is best visualized in 3D, the Displacement map editor also provides a 3D view, that you can enable by clicking the 2D/3D button at the top-left corner of the Editor.
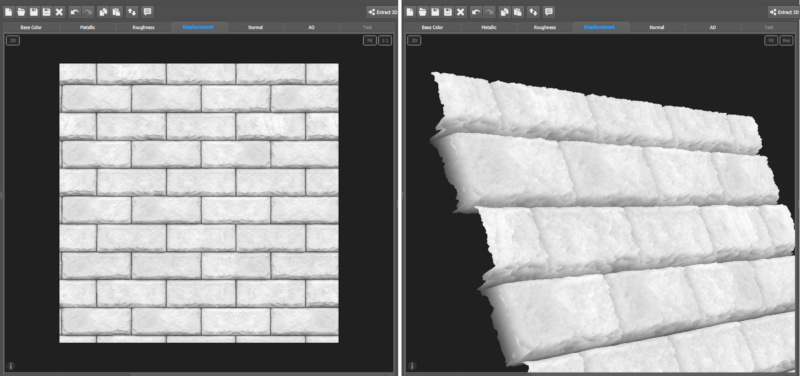
Although the 3D view is quite useful to visualize surface relief, some tools may be better used in the 2D editor, like the Transform tool.
Please see the included Interface Tour Guide for a walk-through of the interface.
3. Real Help Is in the App
PixPlant includes a help system integrated in the app, the place where it is most needed. Anywhere you see an ( i ) button like this:

You can click it for an explanation of that area and its settings. It is available in the 3D Preview, editor areas, tools and windows like the New Maps, Save Maps, Preferences, etc.
Map Tools are special: to get help in an open Map Tool, leave the mouse cursor over its title and the ( i ) button will appear. Click it to get help:
In most interface elements too small for an ( i ) button, you can leave the mouse over the element's label for a tooltip to appear with help.
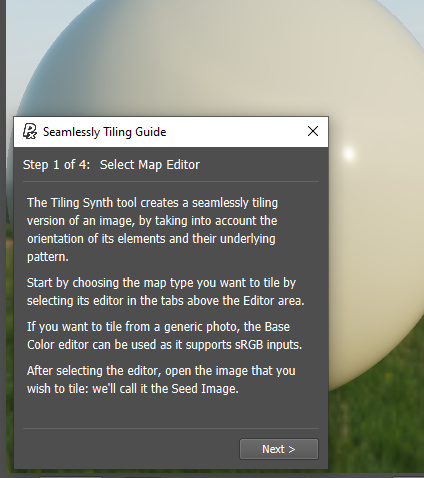
Besides the ( i ) buttons, PixPlant includes an interactive guide or tutorial system that can be accessed from the Guides button at the top-right corner of the interface:
A Guide list will appear, where you'll find interface guides, map guides, tool guides and more. After selecting the Guide, it will lead you through a sequence of steps with explanations and action suggestions:
4. 3D Workflows
PixPlant supports the PBR Metallic-Roughness Workflow and the Traditional Diffuse-Specular Workflow from previous versions.
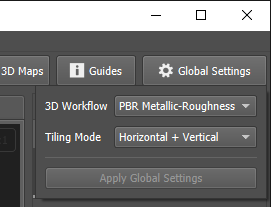
To set the current Workflow, click the Global Settings button at the top-right corner:
The following maps types are supported:
PBR Metallic-Roughness Workflow
- Base Color
- Metallic
- Roughness
Traditional Workflow
- Diffuse
- Specular
Common to All Workflows
- Displacement
- Normal
- Ambient Occlusion (AO)
- Opacity
When the 3D Workflow is changed, the current open maps are closed and editors of the new workflow become available.
The other global setting is the Tiling Mode, which defines if maps should wrap horizontally, vertically or both (the default). This setting affects the behavior of map tools like Tiling Synth, Offset and Paint. For example: painting along the edges of the map will only wrap to the opposite side if the current Tiling Mode allows it. Changing Tiling Mode also prompts to close all open maps.
5. Extract 3D Maps
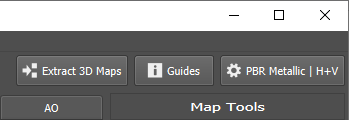
Although most map editors have an Extract tool (usually the first tool at the top of Map Tools), you can use the "Extract 3D Maps" functionality to automate the task of extracting multiple maps from a photo. To extract maps, open the source image in the Base Color or Diffuse editors and click the "Extract 3D Maps" button at the top:
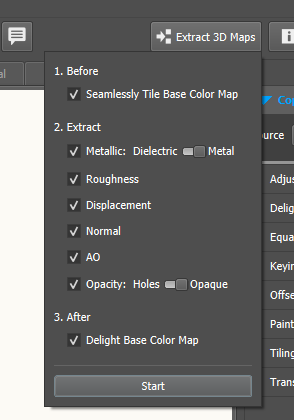
In the "2. Extract" section, check which maps you'd like to extract from the photo opened in Base Color or Diffuse map editors.
The choice of tiling the source map before extracting is also offered, and in the PBR Workflow, of delighting the Base Color map afterwards.
Upon clicking Start, the process begins and maps are extracted in sequence. As you may later wish to change some extraction parameters, each extraction tool remains open in its own Editor.
Please note that if extracting Displacement, Normal and AO maps, if you later modify the Displacement map, those changes will not automatically propagate to the Normal and AO maps that were extracted from it. You'll need to extract Normal and AO (by using their Extract tools) after any Displacement changes.
6. External Edit

In all editors, you can transfer edition of the image into an external editor app and import it back as soon as it is saved from the other editor. This is done by clicking the External Edit button:
The external app can be defined in the Preferences or it will be asked the first time you use this feature.
7. Photoshop Plug-in
PixPlant includes a plug-in for 64-bit Adobe Photoshop (CS6, CC and higher) or other compatible 64-bit hosts with support for RGB and grayscale images.
To launch PixPlant from Photoshop, select Filter > PixPlant > PixPlant 5. The PixPlant window will appear and you'll need to select which map type should the incoming image be edited as. After editing, close PixPlant to return the edited map to Photoshop.
When launched as a plug-in, PixPlant will initially ask which map type should the incoming image be edited as. PixPlant can only return to the plug-in host changes made on the image that you invoked it upon. Even if the input image size is changed in PixPlant, it will still be later resized to the original size when returned to Photoshop. This is a limitation of the Photoshop plug-in interface, as it can only receive back into the same (single) image where the plug-in was invoked.
However, you can still save the image (and any other extracted/edited images) to a file or copy to the Clipboard before returning to Photoshop.
The Windows installer already searches for installations of known Photoshop versions and copies the plug-in to the right locations. To install manually, simply go to the PixPlant installation folder and copy PixPlant5.8bf into the Plug-ins/ folder of your Photoshop installation - make sure you're copying into a 64-bits version of Photoshop as the plug-in is 64-bit only.
8. Activation
A PixPlant license needs to be activated or it will run in trial/evaluation mode. To activate your PixPlant license, click the Activate Button in the Welcome window or select Help > Activate License. The activation window appears where you can enter the Serial code to activate your license:
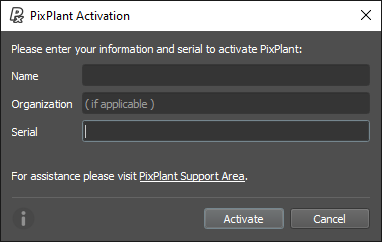
Activation requires an Internet connection and is done only once, not on every app run. To transfer the license to another computer, select Help > Deactivate License and later activate in the new machine.
9. Physical Size Info
Besides width and height sizes in pixels, created maps can store physical size information (in image formats that support it). This information is stored as integer DPI (Dots Per Inch) values, which, together with the map's pixel width and height, can preserve information about a map's real world physical size.
Physical size info can be set, along with width and height pixel sizes, when you create a new map and in the Transform tool. This information is also preserved when you open and save a map of the supporting formats.
When set, the information is listed at the bottom of the map editor:

When the map has the same width and height, only one physical size value is listed (in this case 16.0 cm), otherwise the two sizes are listed.
Please note that DPI information can only be stored in these file formats, which have support for integer DPI values: PNG, TIFF, JPEG, BMP.
Display units can be changed in the Preferences: either centimeters or inches.
See the included Physical Size Info Guide for more information.
10. File Formats
The following image formats are supported for opening and/or saving maps:
| File Format | Open | Save | Save Precision |
|---|---|---|---|
| BMP | O | O | 8 Bits |
| DDS | O | ||
| EXR | O | O | Float |
| GIF | O | ||
| HDR | O | ||
| JPEG | O | O | 8 Bits (avoid saving in this lossy format) |
| JPEG 2000 | O | ||
| JPEG XR | O | ||
| PNG | O | O | 8 and 16 Bits * |
| Photoshop PSD | O | ||
| TARGA | O | O | 8 Bits |
| TIFF | O | O | 8 and 16 Bits * |
| WEBP | O |
* PNG and TIFF can be saved in 8 or 16 bits. Because 16 bits may be unneeded for some map types, the Save window includes a third setting named "Default Map Bits" which saves with the following bit depths:
- Displacement and Normal maps: 16 Bits
- All other maps: 8 Bits
Please avoid saving in JPEG format, which is a lossy format, degrading image quality on each save.
The minimum supported image size is 64x64 pixels. The maximum size depends on GPU capabilities and can be selected in Preferences > Maps > Maximum Map Size, up to a maximum of 16384x16384 pixels.
The 3D Preview accepts the following formats:
| Type | File Formats |
|---|---|
| HDRI environment maps | HDR and EXR images |
| 3D models | FBX, OBJ, 3DS and other formats supported by the Open Asset Import Library (Assimp) |
11. Shortcut Keys
The following shortcut keys are available:
| Action | Shortcut |
|---|---|
| Single Map | |
| New Map | Ctrl + N |
| Open Map | Ctrl + O |
| Save Map | Ctrl + S |
| Save Map As | Ctrl + Alt + S |
| Close Map | Ctrl + W |
| Multiple Maps | |
| New Maps | Ctrl + Shift + N |
| Open Maps | Ctrl + Shift + O |
| Save All | Ctrl + Shift + S |
| Save All As | Ctrl + Alt + Shift + S |
| Export Maps | Ctrl + Shift + X |
| Close All | Ctrl + Shift + W |
| Undo | Ctrl + Z |
| Redo | Ctrl + Y |
| Copy Map | Ctrl + C |
| Paste as New Map | Ctrl + V |
| External Edit Map | Ctrl + E |
| Preferences | Ctrl + K |
3D Preview shortcut keys:
| Action | Shortcut |
|---|---|
| Toggle Base Color / Diffuse | Alt + 1 |
| Toggle Metallic / Specular | Alt + 2 |
| Toggle Roughness | Alt + 3 |
| Toggle Displacement | Alt + 4 |
| Toggle Normal | Alt + 5 |
| Toggle AO | Alt + 6 |
| Toggle Opacity | Alt + 7 |
| Toggle All | Alt + 9 |
| Fit Model in View | Alt + 0 |
| Reset Model | Ctrl + Alt + 0 |
| Reset Model+Camera+Light | Ctrl + Alt + Shift + 0 |
| Toggle Model Rotation | Ctrl + Shift + R |
| Save Snapshot | Ctrl + Shift + P |
| Copy Snapshot | Ctrl + Shift + C |
Map Editor shortcuts:
| Action | Shortcut |
|---|---|
| Switch to Base Color / Diffuse | Ctrl + 1 |
| Switch to Metallic / Specular | Ctrl + 2 |
| Switch to Roughness | Ctrl + 3 |
| Switch to Displacement | Ctrl + 4 |
| Switch to Normal | Ctrl + 5 |
| Switch to AO | Ctrl + 6 |
| Switch to Opacity | Ctrl + 7 |
| Fit Map in View | Ctrl + 0 |
| Toggle PBR Validate (Base Color and Metallic only) |
Ctrl + B |
12. System Requirements
PixPlant requires:
| OS | Windows 11, 10, 8.1 or 7 SP1, 64-bit only |
| GPU | Any GPU compatible with Direct3D 11, with 2Gb+ VRAM |
| Display | A monitor at least 1366 pixels wide is recommended |
| Input | A two-button mouse with scroll wheel is recommended for full functionality |
| Plug-in | Works as a plug-in on Adobe Photoshop (CS6, CC and higher) and compatible hosts, 64-bit only |